Blue/Green deployment strategies allow you to minimize downtime and reduce risk during application updates. In this article, I will walk you through setting up an Amazon ECS (Elastic Container Service) Service with Blue/Green deployment using AWS CodeDeploy.
This approach ensures that your service remains available while rolling out new application versions. AWS CodeDeploy enables you to deploy new versions of your application without causing downtime. It allows for a gradual shift of traffic from the old version (blue) to the new version (green).
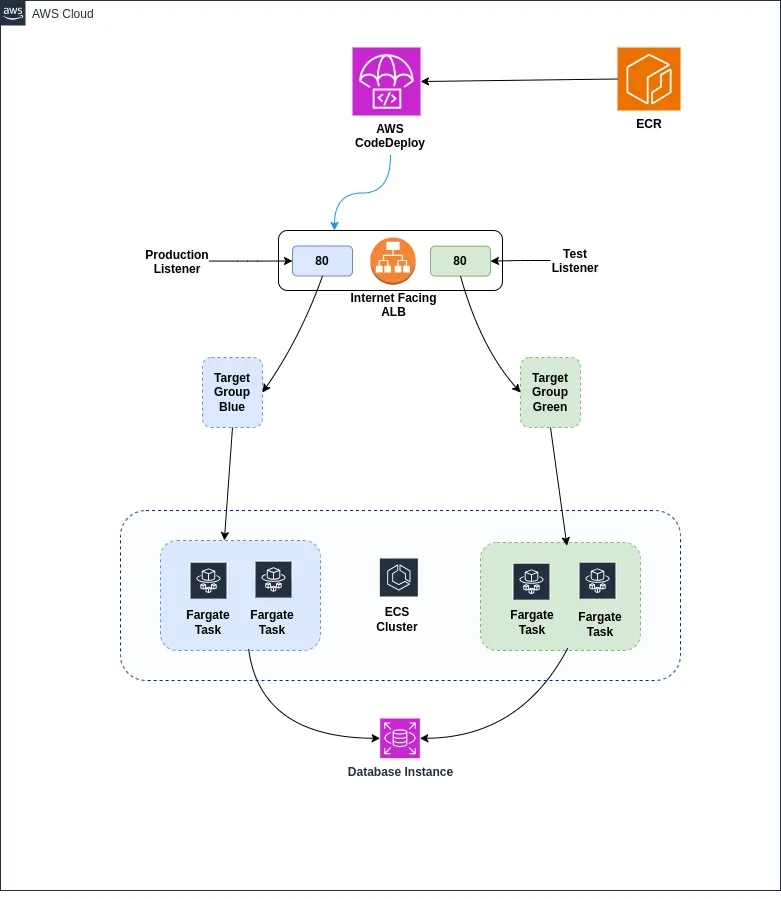
Here is the Overview of a Blue-green deployment:
AWS Services Involved
In the architecture shown above, we use several key AWS services to manage the automated blue-green deployment:
- AWS CodeDeploy manages the blue-green deployment process.
- Two Target Groups with One Application Load Balancer to route traffic between the old and new versions.
- ECS Cluster with a defined Task Definition for the application.
A CodeDeploy deployment group on the Amazon ECS compute platform assigns listeners to direct traffic to the updated ECS application and uses two target groups during the deployment. CodeDeploy also manages rollbacks by redirecting traffic from the new task set back to the original task set if needed.
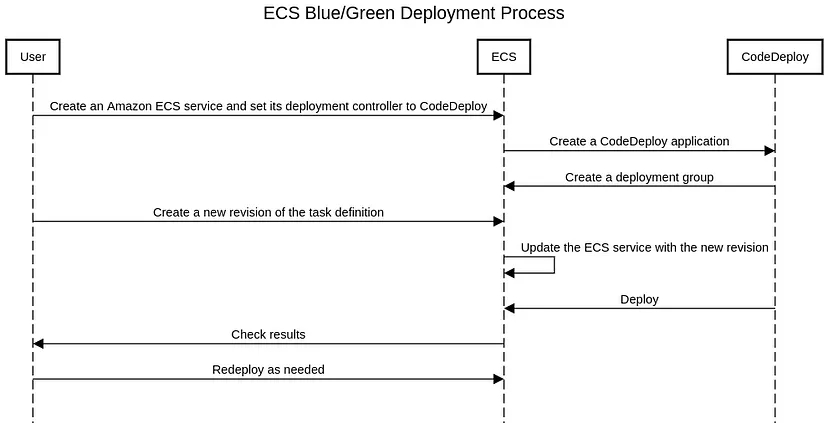
The following sequence diagram illustrates the key steps in updating Amazon ECS services.
Step 1: Setting Up AWS Identity and Access Management (IAM) Service Roles
To kick off the process, it's essential to set up the required permissions using IAM roles. You will need to create roles for both the ECS task execution and the CodeDeploy service. These roles will allow AWS services to interact with each other securely.
- Create an ECS Task Execution Role: This role allows ECS to pull container images and publish logs to Amazon CloudWatch.
- Create a CodeDeploy Role: This role gives AWS CodeDeploy the necessary permissions to manage your ECS services during a Blue/Green deployment.
Here’s how to create these roles:
- Open the IAM Console.
- Choose Roles from the navigation panel.
- Click Create Role, and then select the required services (ECS, CodeDeploy).
- Use the AWS Managed PolicyAWSCodeDeployRoleForECS for the IAM role.
Step 2: Creating the Application Load Balancer (ALB)
An Application Load Balancer (ALB) distributes incoming traffic across multiple targets, such as Amazon ECS tasks in this case. The ALB plays a crucial role in Blue/Green deployment by directing traffic between the old (blue) and new (green) versions.
To create an ALB:
1. Open the EC2 Console, and navigate to Load Balancers.
2. Choose Create Load Balancer and select Application Load Balancer.
3. Configure the listener to forward HTTP (port 80) or HTTPS (port 443) requests.
4. Choose at least two Availability Zones to ensure high availability.
5. Create a new target group(Target Group 1 — Blue) or use an existing one to register your Blue Version ECS tasks.
The ALB will handle routing during deployment, gradually shifting traffic from the blue version to the green one.
Step 3: Creating the Amazon ECS Task Definition
Next, create an ECS task definition, which is a blueprint describing the containers to run as part of your ECS service. This step involves defining the Docker image, CPU, memory requirements, and networking configuration.
Steps to create an ECS Task Definition:
1. Open the Amazon ECS Console.
2. Choose Task Definitions, then click Create new Task Definition.
3. Select Fargate as your launch type.
4. Define the container configuration, including:
- Container image (e.g., from Amazon ECR or Docker Hub)
- CPU and memory allocation
- Environment variables and logging settings.
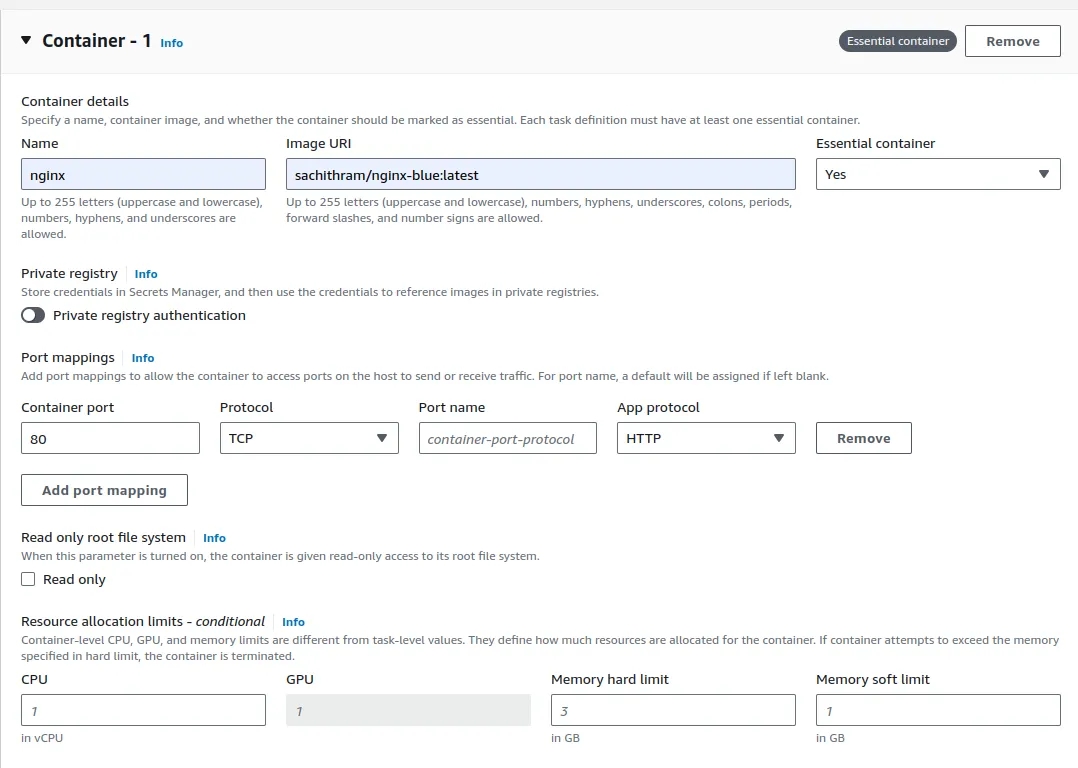
For testing purposes, you can use the Nginx Docker image with an HTML file to identify the Blue/Green version.
Let’s use the Docker image sachithram/nginx-blue:latest for the blue version. To perform the blue/green deployment, create a new revision of the task definition, updating only the image tag sachithram/nginx-green:latest for the green version.

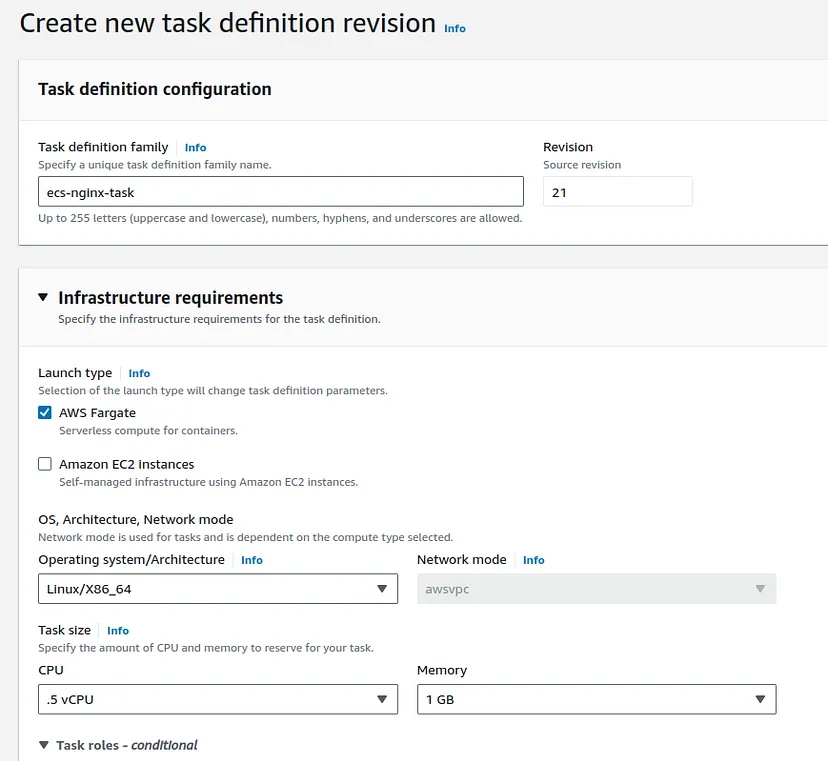
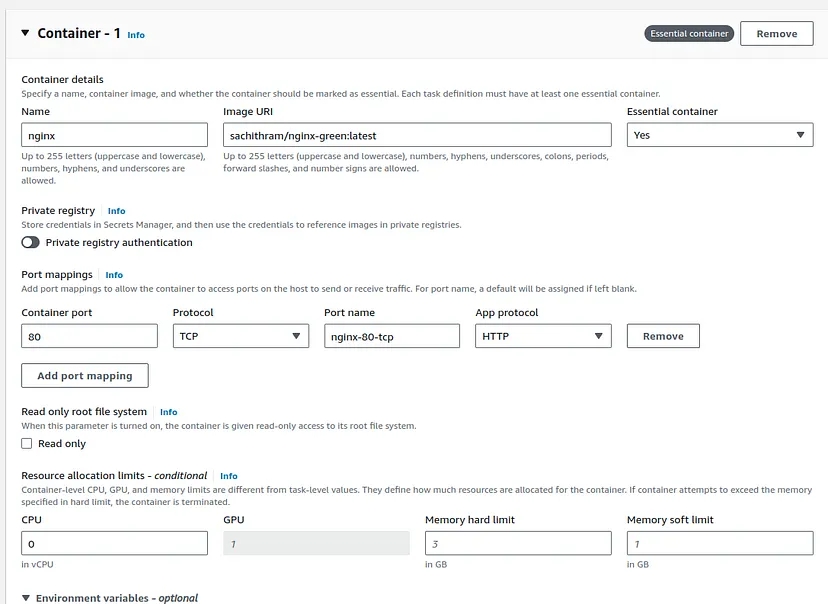
5. Once the task definition and revision are created, this configuration will be used to launch containers during the Blue/Green deployment process.
Step 4: Creating the Amazon ECS Service with Blue/Green Deployments
With your task definition ready, the next step is to create an ECS service that uses Blue/Green deployments. AWS CodeDeploy will manage the process, ensuring the new version is tested before routing traffic to it fully.
Steps to create the ECS service with Blue/Green deployment:
1. Open the Amazon ECS Console: Go to the Amazon ECS Console.
2. Select Your ECS Cluster: Navigate to Clusters and choose the ECS cluster where you want to deploy your service. Let's use a Fargate Type ECS Cluster.
3. Select Blue Task Definition.
4. Create Service: Click Create Service and select the Fargate launch type.
5. Deployment Type: Under Deployment type, select Blue/Green deployment (powered by CodeDeploy).
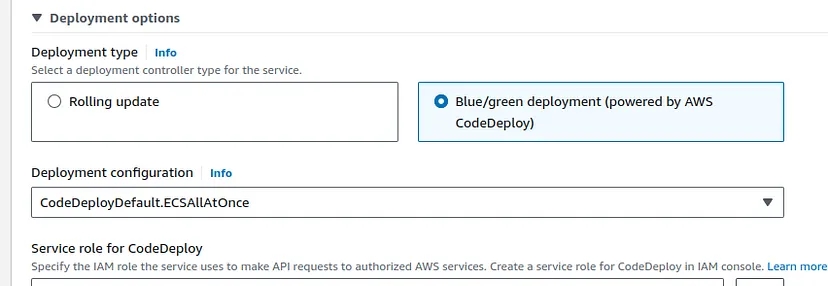
In the deployment configuration of AWS CodeDeploy for ECS, select the “ECSAllAtOnce” method.
ECSAllAtOnce is a deployment strategy where all tasks in the service are updated simultaneously. This deployment method quickly replaces the old (blue) version of the tasks with the new (green) version without any gradual traffic shift.
5. Specify the number of tasks you want your service to run.
6. Networking Setup: Choose the VPC where your ECS cluster runs. Ensure the subnets you select are accessible to the Application Load Balancer (ALB) created in the previous step.
- For Subnets, choose two subnets in different availability zones to ensure high availability.
- Security Group Configuration: Choose or create the Security Groups for the ECS tasks. Ensure that the security group allows communication between the ECS tasks and the ALB. Add any necessary inbound/outbound rules, such as allowing TCP port 8080 if your application listens on that port.
- You should create two security groups: Load Balancer Security Group and Container Security Group for the ECS service. The Load Balancer Security Group should allow inbound traffic from the internet. The Container Security Group should restrict inbound traffic only to allow connections from the Load Balancer Security Group, ensuring that the containers are only accessible through the load balancer.
7. Load Balancer Selection:
- Under the Load Balancing section, select the Application Load Balancer (ALB) that you created in the previous step.
- Next, you’ll need to associate your ECS tasks with the load balancer listeners:
- For Production Listener, choose Port 80 (HTTP).
- For Test Listener, enter Port 8080 (or any port that the green deployment will be using for testing).
- Ensure that the ALB listeners and security groups are set up to allow traffic from the ECS service.
8. Target Group Configuration:
Target Group 1: Select the target group you created earlier when setting up the ALB. This will be the blue version target group.
Target Group 2: If you haven’t created a second target group for the green environment, create it here and associate it with your ECS service.
Auto Scaling (Optional): You can configure Auto Scaling based on your needs.
Review and Create Service: Review your settings and click Create Service to finalize the configuration.
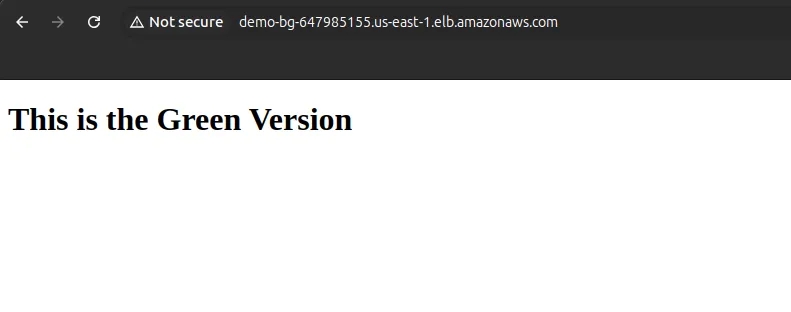
When you create the service you can go to the load balancer URL and you will see the blue version can be accessed from the load balancer.

What AWS CodeDeploy Will Handle:
- AWS CodeDeploy will manage traffic shifting between the blue (current) version tasks and the green (new) version tasks.
- It will perform health checks on the green environment before switching all traffic.
Step 5: Verifying the Amazon ECS Blue/Green Deployment
Finally, you need to verify that the deployment was successful and the new environment is running as expected. AWS CodeDeploy allows you to perform gradual traffic shifting, monitor deployment health, and perform rollbacks if necessary.
Steps for verification:
1. Open the CodeDeploy Console.
2. Under Deployments, you will see your ongoing ECS Blue/Green deployment.
3. Check the Deployment Status to ensure the green environment receives traffic successfully.
4. Once the new version is stable and working, CodeDeploy will shift all traffic from blue to green.
Update the ECS service with the new Green Task Revision. Once updated, navigate to the AWS CodeDeploy Dashboard, where you will see a new deployment has been triggered.

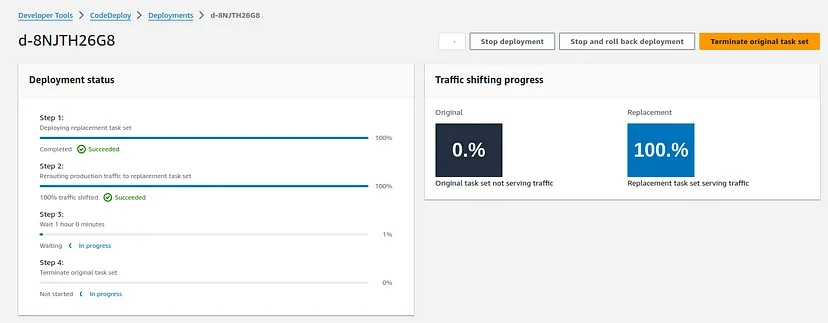
It will wait for one hour before terminating the original task set (Blue version). However, you have the option to manually roll back, stop, or terminate the tasks at any point during this process.

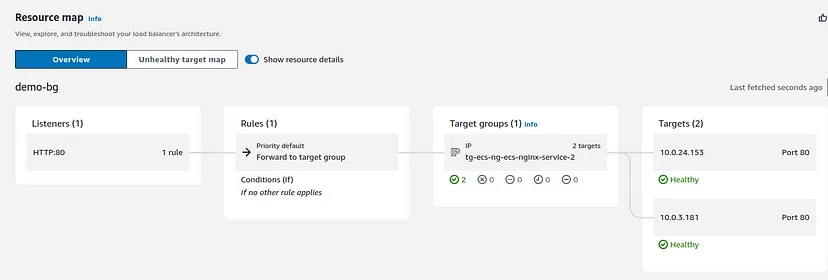
You can monitor the health of the ECS service and verify the deployment success by observing:
- Application logs (via CloudWatch).
- Load balancer metrics (via the ALB).
- Traffic distribution between the two versions.
- You can find events in the CloudTrail history showing that modifications to the ALB listener were performed by AWS CodeDeploy itself.
- Additionally, you can view the deployment activities directly from the AWS CodeDeploy dashboard.
Note: You can set up a deployment group to automatically trigger rollbacks when specific conditions are met, such as a deployment failure or a monitoring alarm threshold being reached.
References:
https://docs.aws.amazon.com/codedeploy/latest/userguide/deployment-steps-ecs.html


